Category: Pokemon

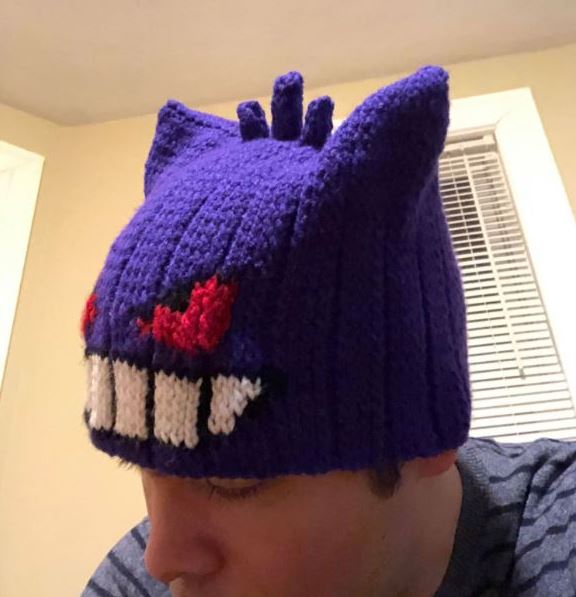
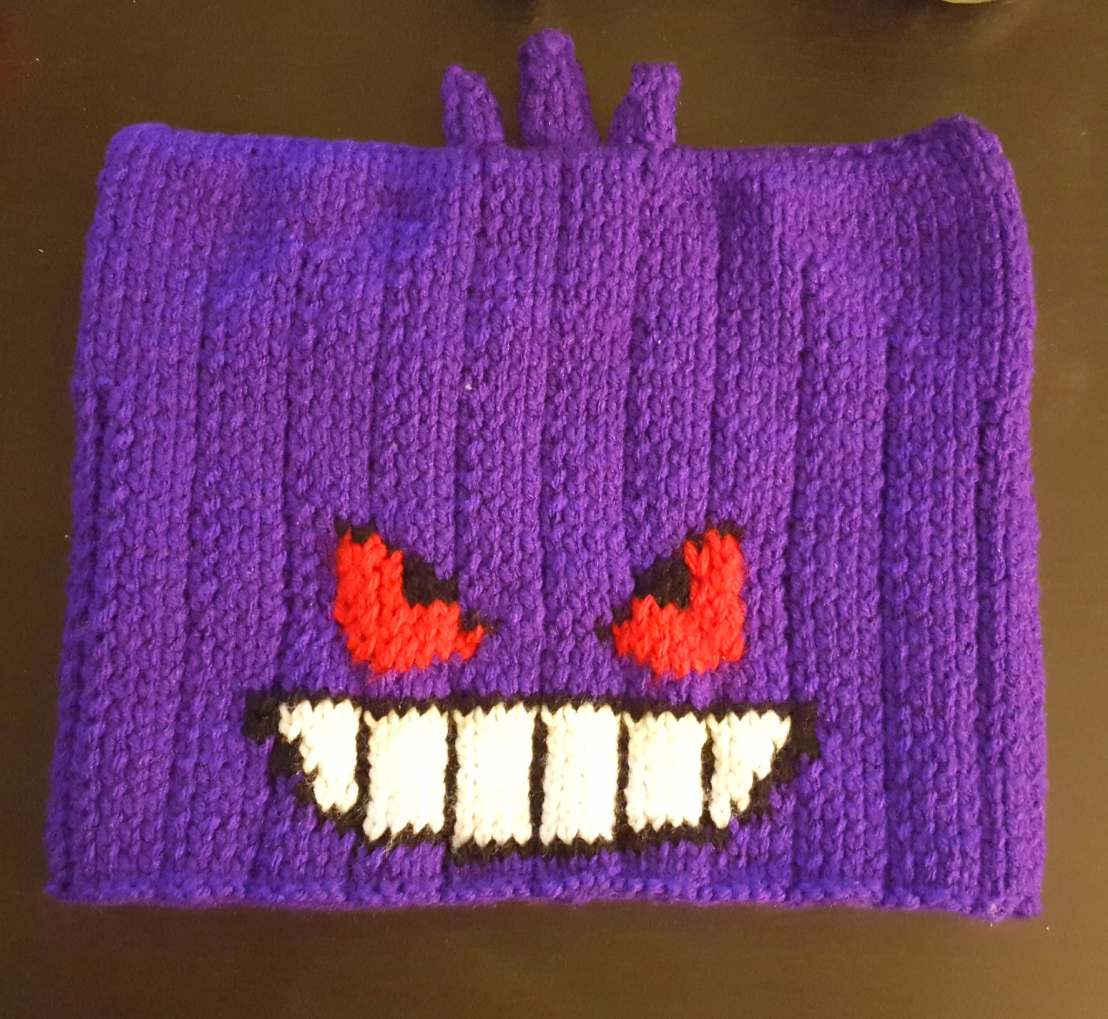
Gengar Beanie

46344177_223950841869931_6401997828154982400_n.jpg

Pattern available here!

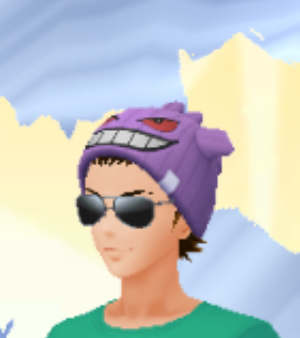
My goal with this project was to create a hat inspired by the hat seen in the Pokémon Go game:

45642411_671321519935275_3308532304472702976_n

After doing a quick internet search, I found one easy way to make ears on a beanie is to simply make two rectangular pieces and stitch them together. Once the hat is worn, the corners stand up, making ears!

Gengar worn flip

I also wanted to mimic the lines seen in the game, so I made 4 x 1 ribbing all the way around. Plus, it’s always handy to rib beanies anyway since it makes them stretchier and more likely to fit the head of whoever’s wearing them! I lined up the black lines on the smile with the ribbing, which worked out really well. The hat in the game lines up in the center but then stops lining up at the edges, which I just found strange once I noticed it. But this was simpler.

This was a quick and easy project that I definitely recommend to anyone looking for a simple first beanie that also offers the chance to work on some fair isle technique, since you don’t have to do any circular knitting, just two rectangles.

“If you feel a sudden chill, it is certain that a Gengar appeared.” – Pokémon Gold Version

Gengar Beanie Pattern

46344177_223950841869931_6401997828154982400_n

Pattern for Pokemon Go-inspired Gengar beanie:

Knitted on size 8 needles, medium weight yarn

Final dimensions: 20″ (51 cm) circumference (unstretched), 7.5″ (19 cm) height

Colors: Purple, Black, White, Red

Front

Starting with purple, c/o 57 stitches

R1: K3 P1 [K4 P1]x10 K3

R2: Begin the black line at the bottom of the mouth. For the face pattern, I think this graph does a better job showing the colors than I would do describing it. Lighter colors are the 4 rib, darker colors are the 1 rib (black is just black on this graph but follow the ribbing stitch used for that whole column).

**An explanation of how to do the multiple colors in fair isle is located at the bottom of this post**
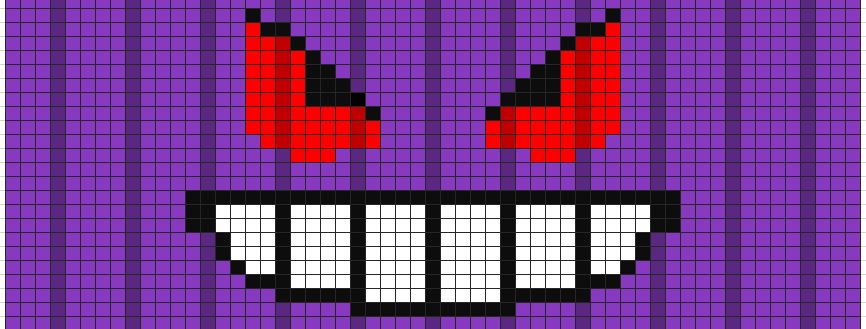
Gengar face

Once the face is complete,

R24: P3 K1 [P4 K1]x10 P3

R25: K3 P1 [K4 P1]x10 K3

Repeat [R24, R25] until piece measures 5″ (12.5 cm) long, finishing after a reverse side row

R26*: K8 P1 [K4 P1]x8 K8

R27*: P8 K1 [P4 K1]x8 P8

Repeat [R26*, R27*] until piece measures 6″ (15 cm) long, finishing after a reverse side row

R28*: K13 P1 [K4 P1]x6 K13

R29*: P13 K1 [P4 K1]X6 P13

Repeat [R28*, R29*] until piece measures 6.5″ (16.5 cm) long, finishing after a reverse side row

R30*: K18 P1 [K4 P1]x4 K18

R31*: P18 K1 [P4 K1]x4 P18

R32*: K23 P1 [K4 P1]x2 K23

R33*: P23 K1 [P4 K1]x2 P23

Repeat [R32*, R33*] until piece measures 7.5″ (19 cm) long

c/o

Back

c/o 57 stitches in purple

R1: K3 P1 [K4 P1]x10 K3

R2: P3 K1 [P4 K1]x10 P3

Repeat [R1, R2] until piece measures 5″ long, finishing after a reverse side row

R3*: K8 P1 [K4 P1]x8 K8

R4*: P8 K1 [P4 K1]x8 P8

Repeat [R3*, R4*] until piece measures 6″ (15 cm) long, finishing after a reverse side row

R5*: K13 P1 [K4 P1]x6 K13

R6*: P13 K1 [P4 K1]X6 P13

Repeat [R5*, R6*] until piece measures 6.5″ (16.5 cm) long, finishing after a reverse side row

R7*: K18 P1 [K4 P1]x4 K18

R8*: P18 K1 [P4 K1]x4 P18

R9*: K23 P1 [K4 P1]x2 K23

R10*: P23 K1 [P4 K1]x2 P23

Repeat [R9*, R10*] until piece measures 7.5″ (19 cm) long

c/o

Short Hair (make two)

c/o 8 stitches in purple

R1: K across (8)

R2: P across (8)

R3: K3 K2tog K3 (7)

R4: P2 P2tog P3 (6)

R5: K2 K2tog K2 (5)

R6: P1 P2tog P2 (4)

c/o

Long Hair (make one)

c/o 10 stitches in purple

R1: K across (10)

R2: P across (10)

R3,4: repeat [R1, R2]

R5: K4 K2tog K4 (9)

R6: P3 P2tog P4 (8)

R7: K3 K2tog K3 (7)

R8: P2 P2tog P3 (6)

R9: K2 K2tog K2 (5)

R10: P1 P2tog P2 (4)

c/o

Assembly:

Mattress stitch the sides of the front and back together. Whip stitch the tops together.

Fold the pieces of hair so that they make long tubes and stitch the sides together, closing the top but leaving the bottom open. Stitch the hairs onto the center of the top of the hat. Weave in all ends or tie and cut.

This hat is plenty large to add a fleece liner for extra warmth if you so choose!

As always, let me know if you have any questions about my methods! Leave a comment below or contact me via Instagram (@createmarvelous)


Note: Fair Isle Knitting

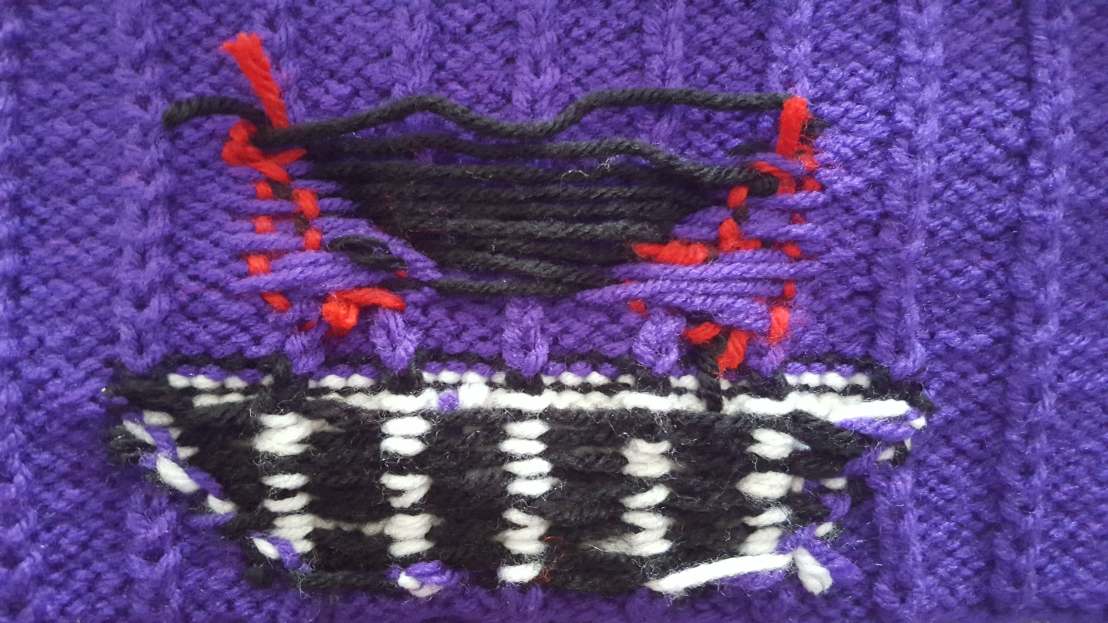
To do the face on Gengar, I used the Fair Isle technique, which is very straightforward. It allows you to use many different colors by simply pulling the yarn strands through on the reverse side. So if you switch colors, just drop the color you were working with and pick up the color you want to use.
46501883_2210368668995654_847834210747023360_n.jpg

The biggest challenge with Fair Isle is leaving enough slack in the yarn that the patterned part is still stretchy, but not so much that the yarn behind is drooping, since that could leave visible holes and loose stitches in the front (you can see that last black strand at the top is going a little crazy).

Also, for this pattern I recommend using two separate purple strands for either side of the mouth just because the mouth becomes so wide it’s a lot of purple to try to pull across and it’ll likely end up being too tight on the ribbing. If you do make the purple two separate strands like I did, be sure to wrap the purple and the black together each row (since the purple and black won’t be connected otherwise and you’ll definitely get a nice big hole if you don’t)

Eeveelution Blanket

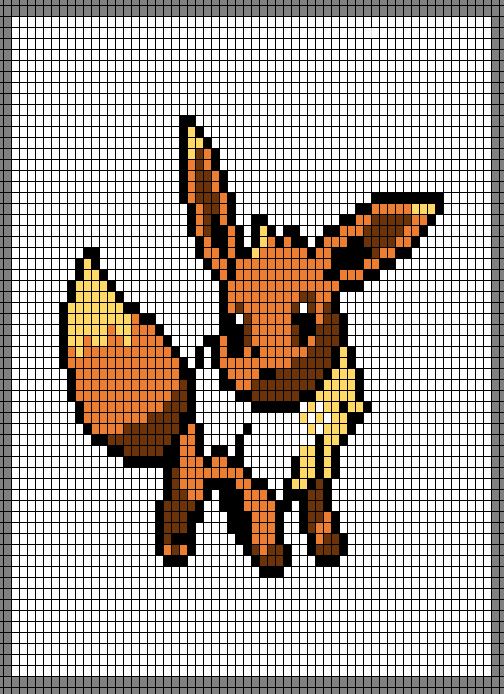
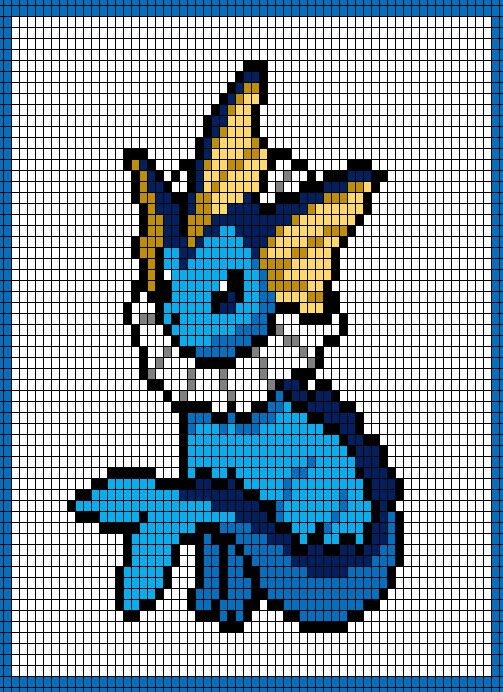
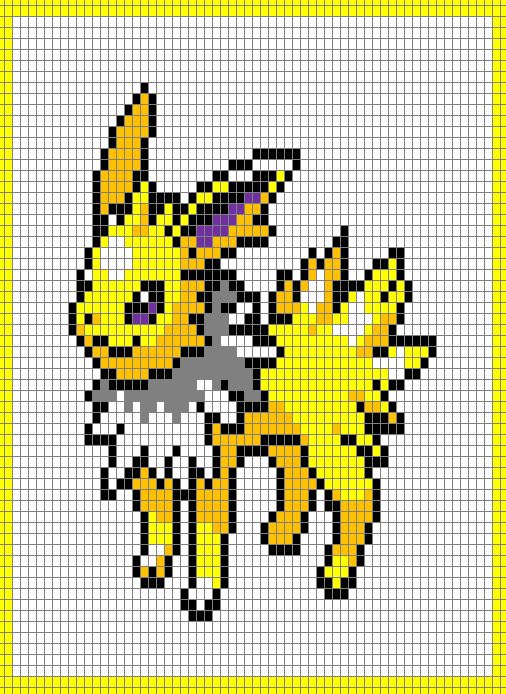
Eevee Blanket

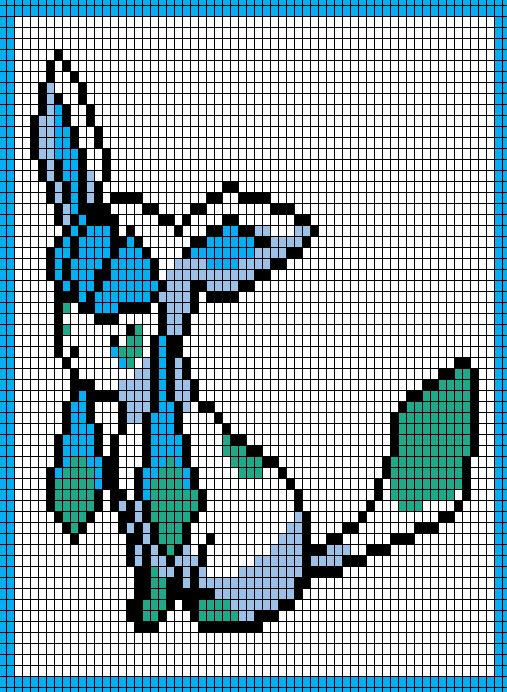
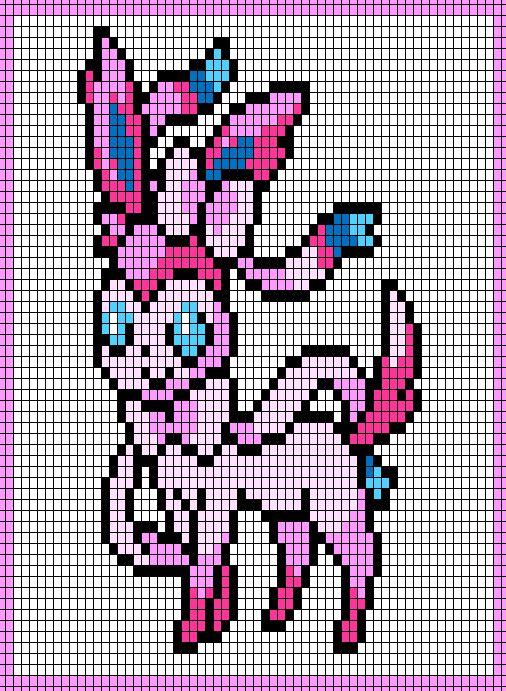
*Patterns available here!*

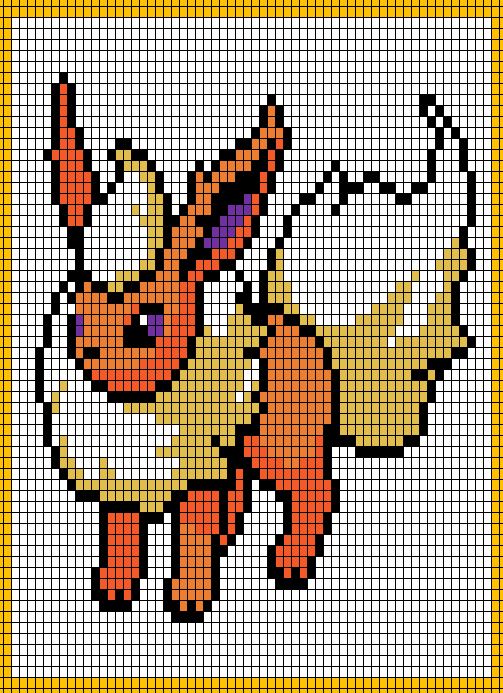
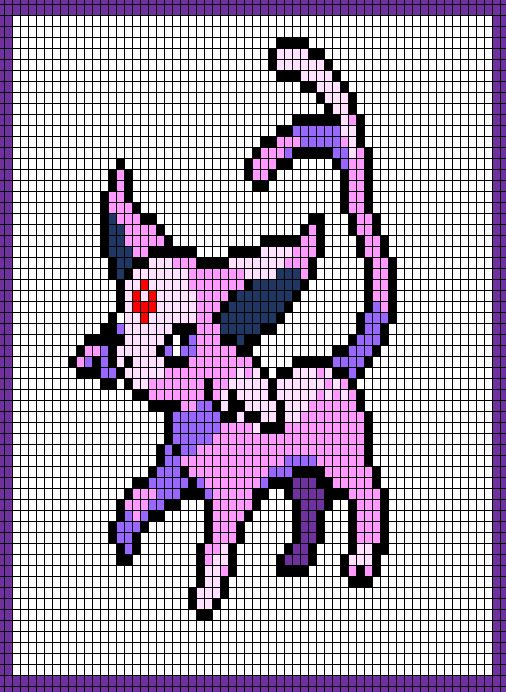
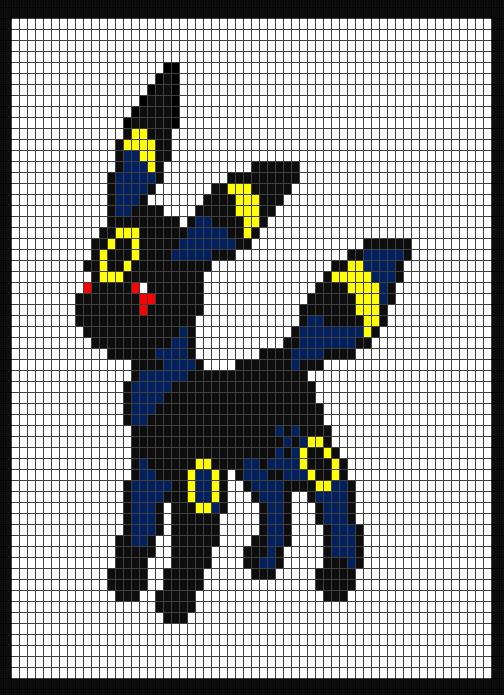
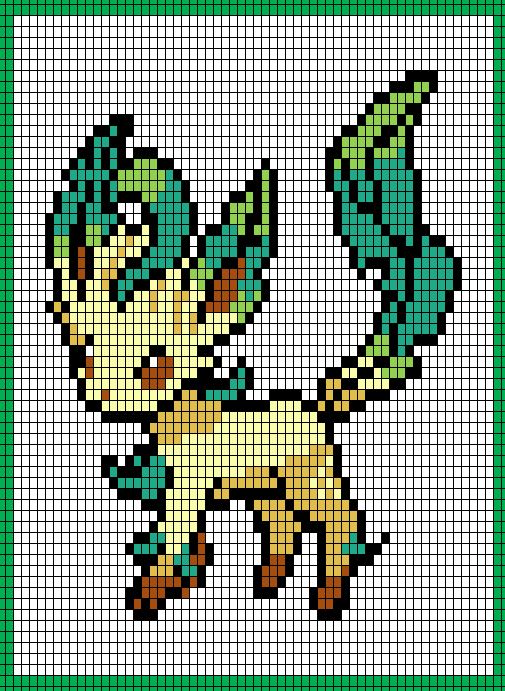
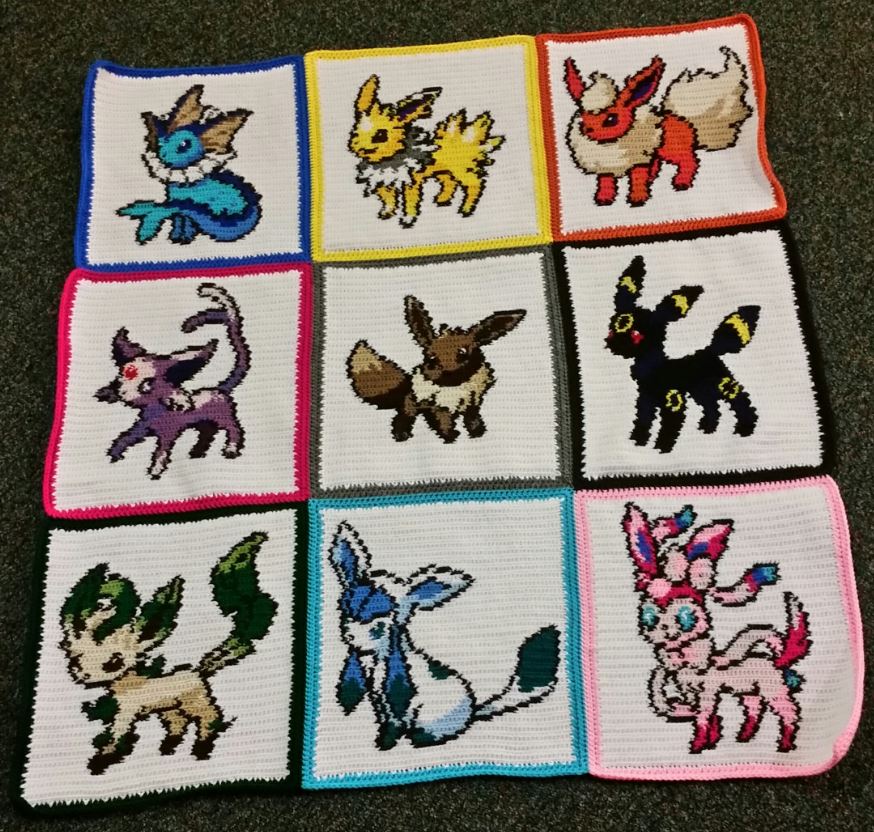
Second Pokémon blanket is here! For this one, I decided to make the Eevee evolution family (before the next evolution comes out and they no longer add up to a nice square number, of course).

My strategy for this blanket was based on what I did for the Justice League Blanket. Single crochet, alternating front and back stitches each row. I’ve found this method keeps patterns small and allows me to use several colors without sacrificing detail in the finished images. It just also makes me hate the act of weaving in ends because there are just so many. There is still some vertical distortion since the stitches are taller than they are wide, but it is not very noticeable in the individual images. Overall, the blanket came out surprisingly small, only 38″ wide x 42″ tall (96 x 106 cm), so it’s a bit more like a small rug than a real blanket, but that’s fine with me.

For the borders, I did two rows of half double crochets. Along the top and bottom sides, I also skipped every fourth stitch, since I noticed that including those made the squares splay out at the sides and look pretty uneven. Probably a problem that could also be attacked with blocking, but I’ve never been very good at blocking. So this seems to work for now.

In all honesty I wanted the background colors to be colors more befitting each individual Pokémon, but alas Umbreon was not going to work on a black background, so it ended up just being white, with type colors in the borders. I think that was enough to make it look interesting without being too overwhelming.

As always, let me know if you have any questions or comments below!

“Its ability to evolve into many forms allows it to adapt smoothly and perfectly to any environment.” -Pokémon Crystal

Pokémon Patterns

Pokemon Blanket

I decided to try something new, that is, upload some patterns!

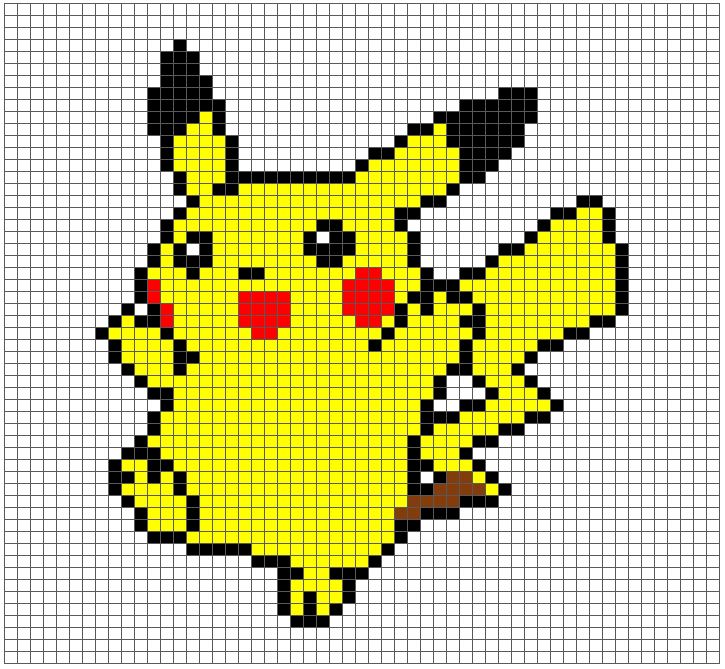
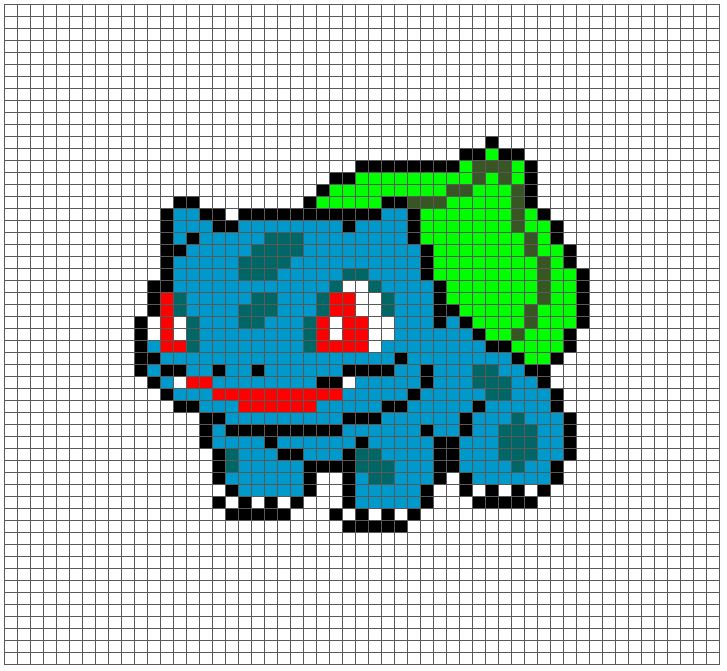
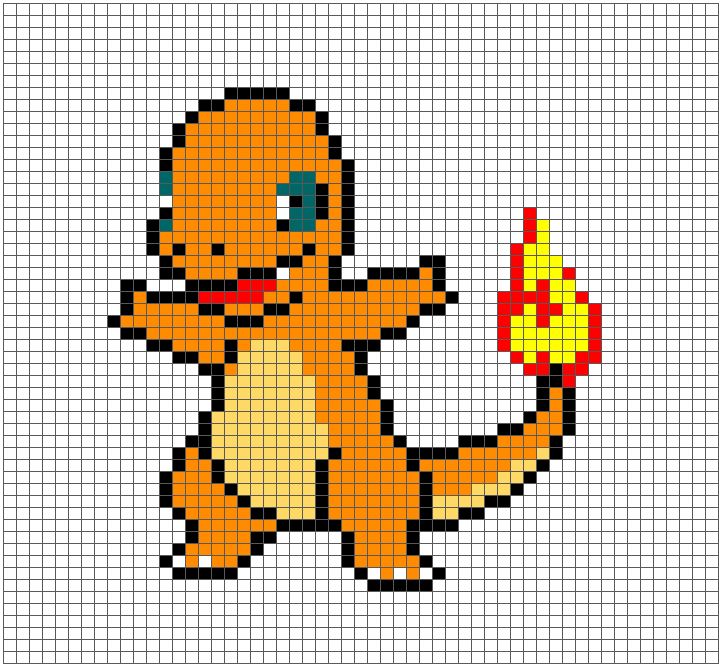
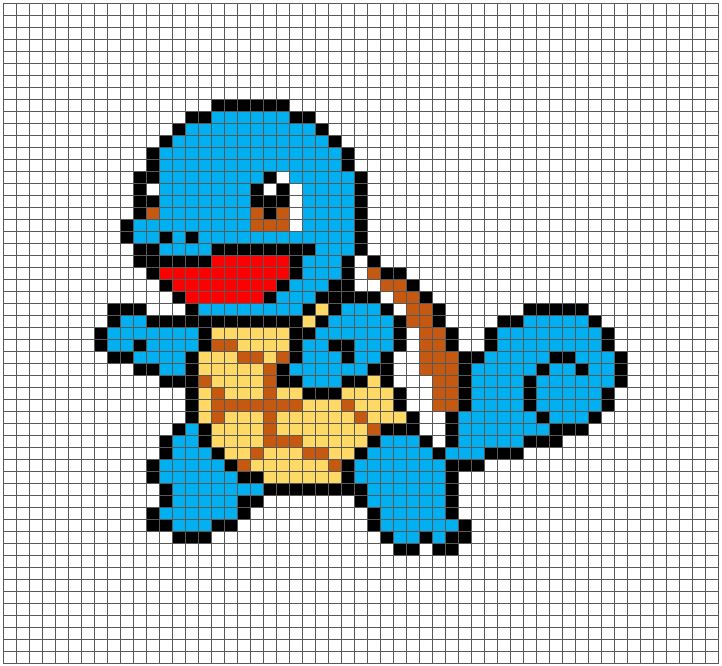
Really, all this is are the gridded images I used to create the Pokémon blanket above, with some explanation of how I used them to make the blanket. I crocheted each square individually, using double crochet and making each pixel in the images below two dcs wide and one dc tall. Each square was 110 dcs wide by 55 dcs tall.

And here are the gridded images:

Pikachu

Pikachu Pattern

Colors used: Black, Yellow, Red, White, Brown

In the blanket, I used a slightly more gold yellow for the background (it’s hard to see with the lighting in the picture, but it is a different yellow than what I used for Pikachu’s body)

Bulbasaur

Bulbasaur Pattern.JPG

Colors used: Black, Light Blue, Teal, Red, White, Bright Green, Dark Green

Apologies for the teal and dark green looking so similar in this pattern. I used teal on Bulbasaur’s actual body and dark green on the bulb on its back. I then used a kelly green for the background of the whole square.

CharmanderCharmander Pattern.JPG

Colors used: Black, Orange, Tan, Teal, White, Red, Yellow

I used a darker orange for the background of this square. Note! That is a white square on the left eye, not part of the background!

SquirtleSquirtle Pattern

Colors used:Black, Light Blue, Red, Brown, White, Tan

Dark blue for the background

Some notes about Squirtle: I think what I have gridded here is slightly different from what I used in making the actual blanket. I forgot to put the white around the right eye in the actual blanket (bad move…it looks so much better with the white…) and this gridded image might be a little wider than the one I used in the blanket..I’m not really sure how that happened, something when I was transferring it to digital form.

So there you have it! Feel free to use these patterns however you wish, I do not own these characters. If you do make something and post it, I’d love to see it! Send me an email, reach out on Instagram, or link back to this page. And take a look at the Showcase to see what other people have already made with them!

Please let me know if something doesn’t make sense about these patterns. It is my first time posting patterns, so I appreciate any feedback to make it better!

Additional Pokémon:

Contact me if you’re looking for a particular Pokémon and if I have time, I’ll see if I can make a chart!

Pokémon Blanket

Pokemon Blanket

*Edit: Pattern available here!

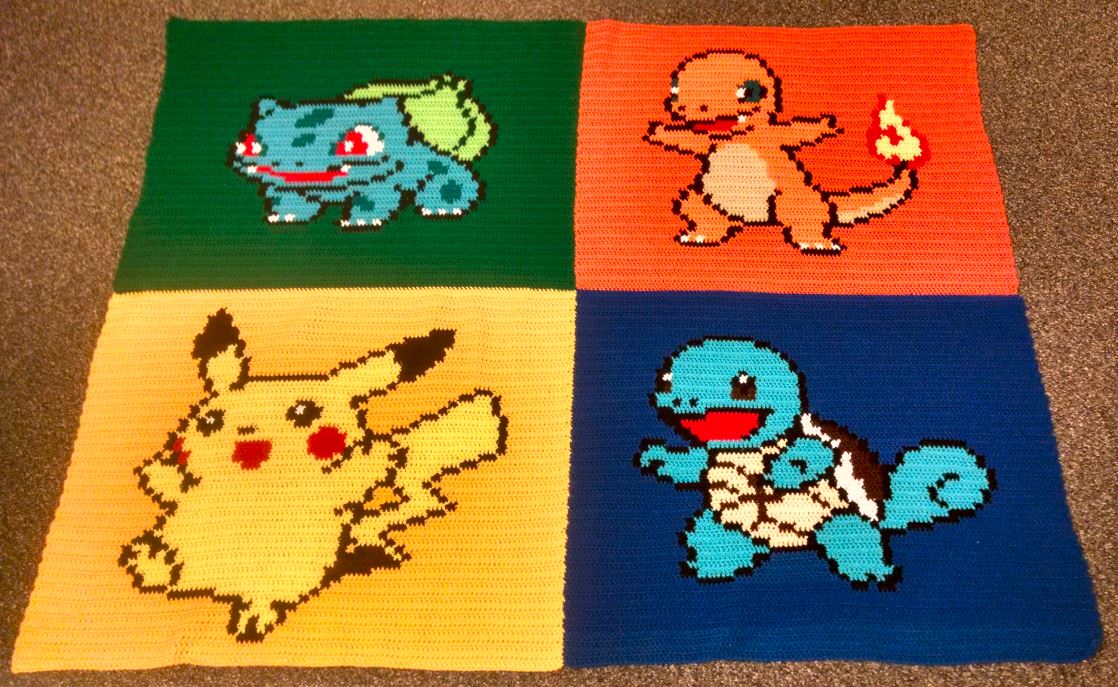
In honor of the 20th anniversary of Pokémon this year, this blanket felt like a must-do. Measuring in at a whopping 48 x 65 inches, this one was actually incredibly quick to make (for me). I started it last November, so it only took 4-5 months, as opposed to my usual ~8.

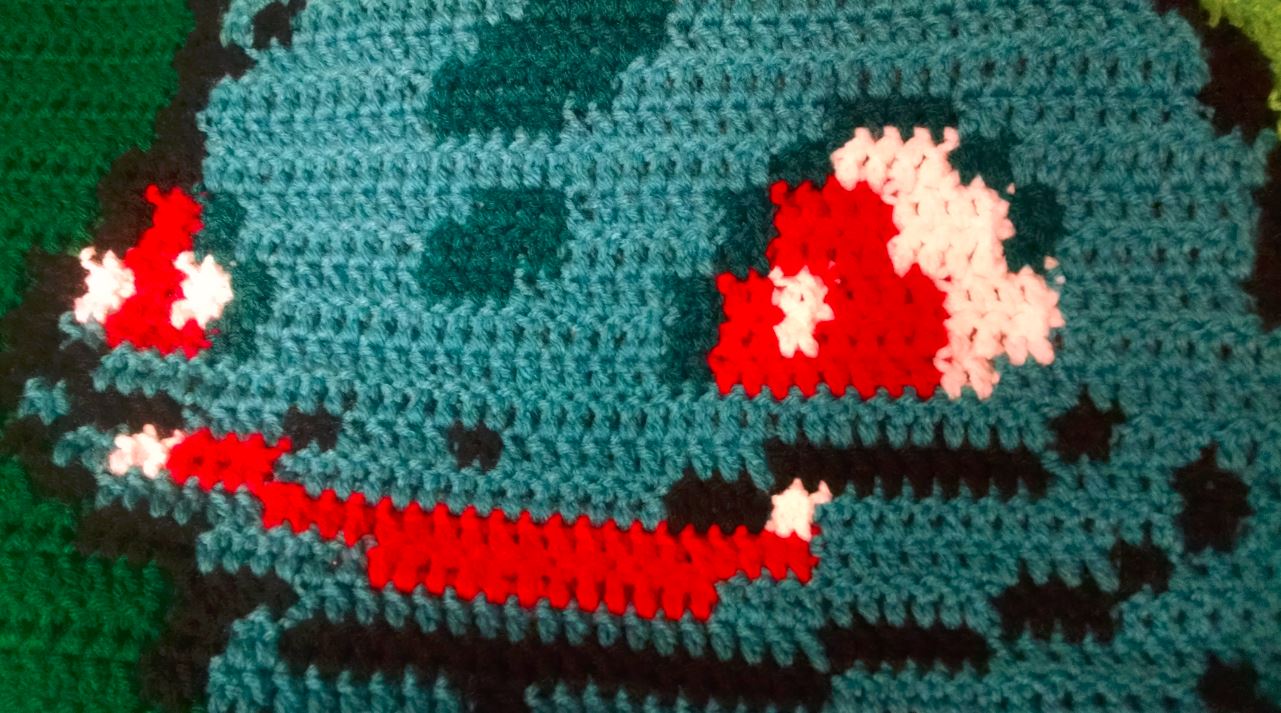
Unfortunately, I did not magically get a lot faster at my crochet (boy, that would be nice). Instead, I used double crochet through the whole thing instead of single, and made each pixel 2 double crochets wide and 1 double crochet tall. So each individual Pokémon ‘square’ is 110 stitches wide and 55 tall. They’re still pretty distorted, since two dcs are wider than they are tall, but it’s not too bad. Still gunning for that ultimate dream of no distortion. One day. Here’s a closeup of Bulbasaur’s face so you can see the distortion and the stitching a bit better:

Bulbasaur's Face

Another thing I have to mention is that this blanket came out quite a bit bigger than I was expecting. I had been planning on putting a border and more fun stuff on it, but once the four pieces were done, I realized anything more would just be beyond overkill and would make the thing absolutely massive. I was going to try fringes, but I started doing them and thought they didn’t add anything. So unless I come up with something better later on, it’ll stay like this. It’s pretty simple, but I think the bright colors make up for it.

Overall, a fun project with reasonably small patterns (I did simplify the colors; mainly I took out all of the shadowing, which made life much easier). As always, let me know if you have any questions or comments below!

“We do have a lot in common. The same Earth, the same air, the same sky. Maybe if we started looking at what’s the same instead of always looking at what’s different…well, who knows?” -Meowth