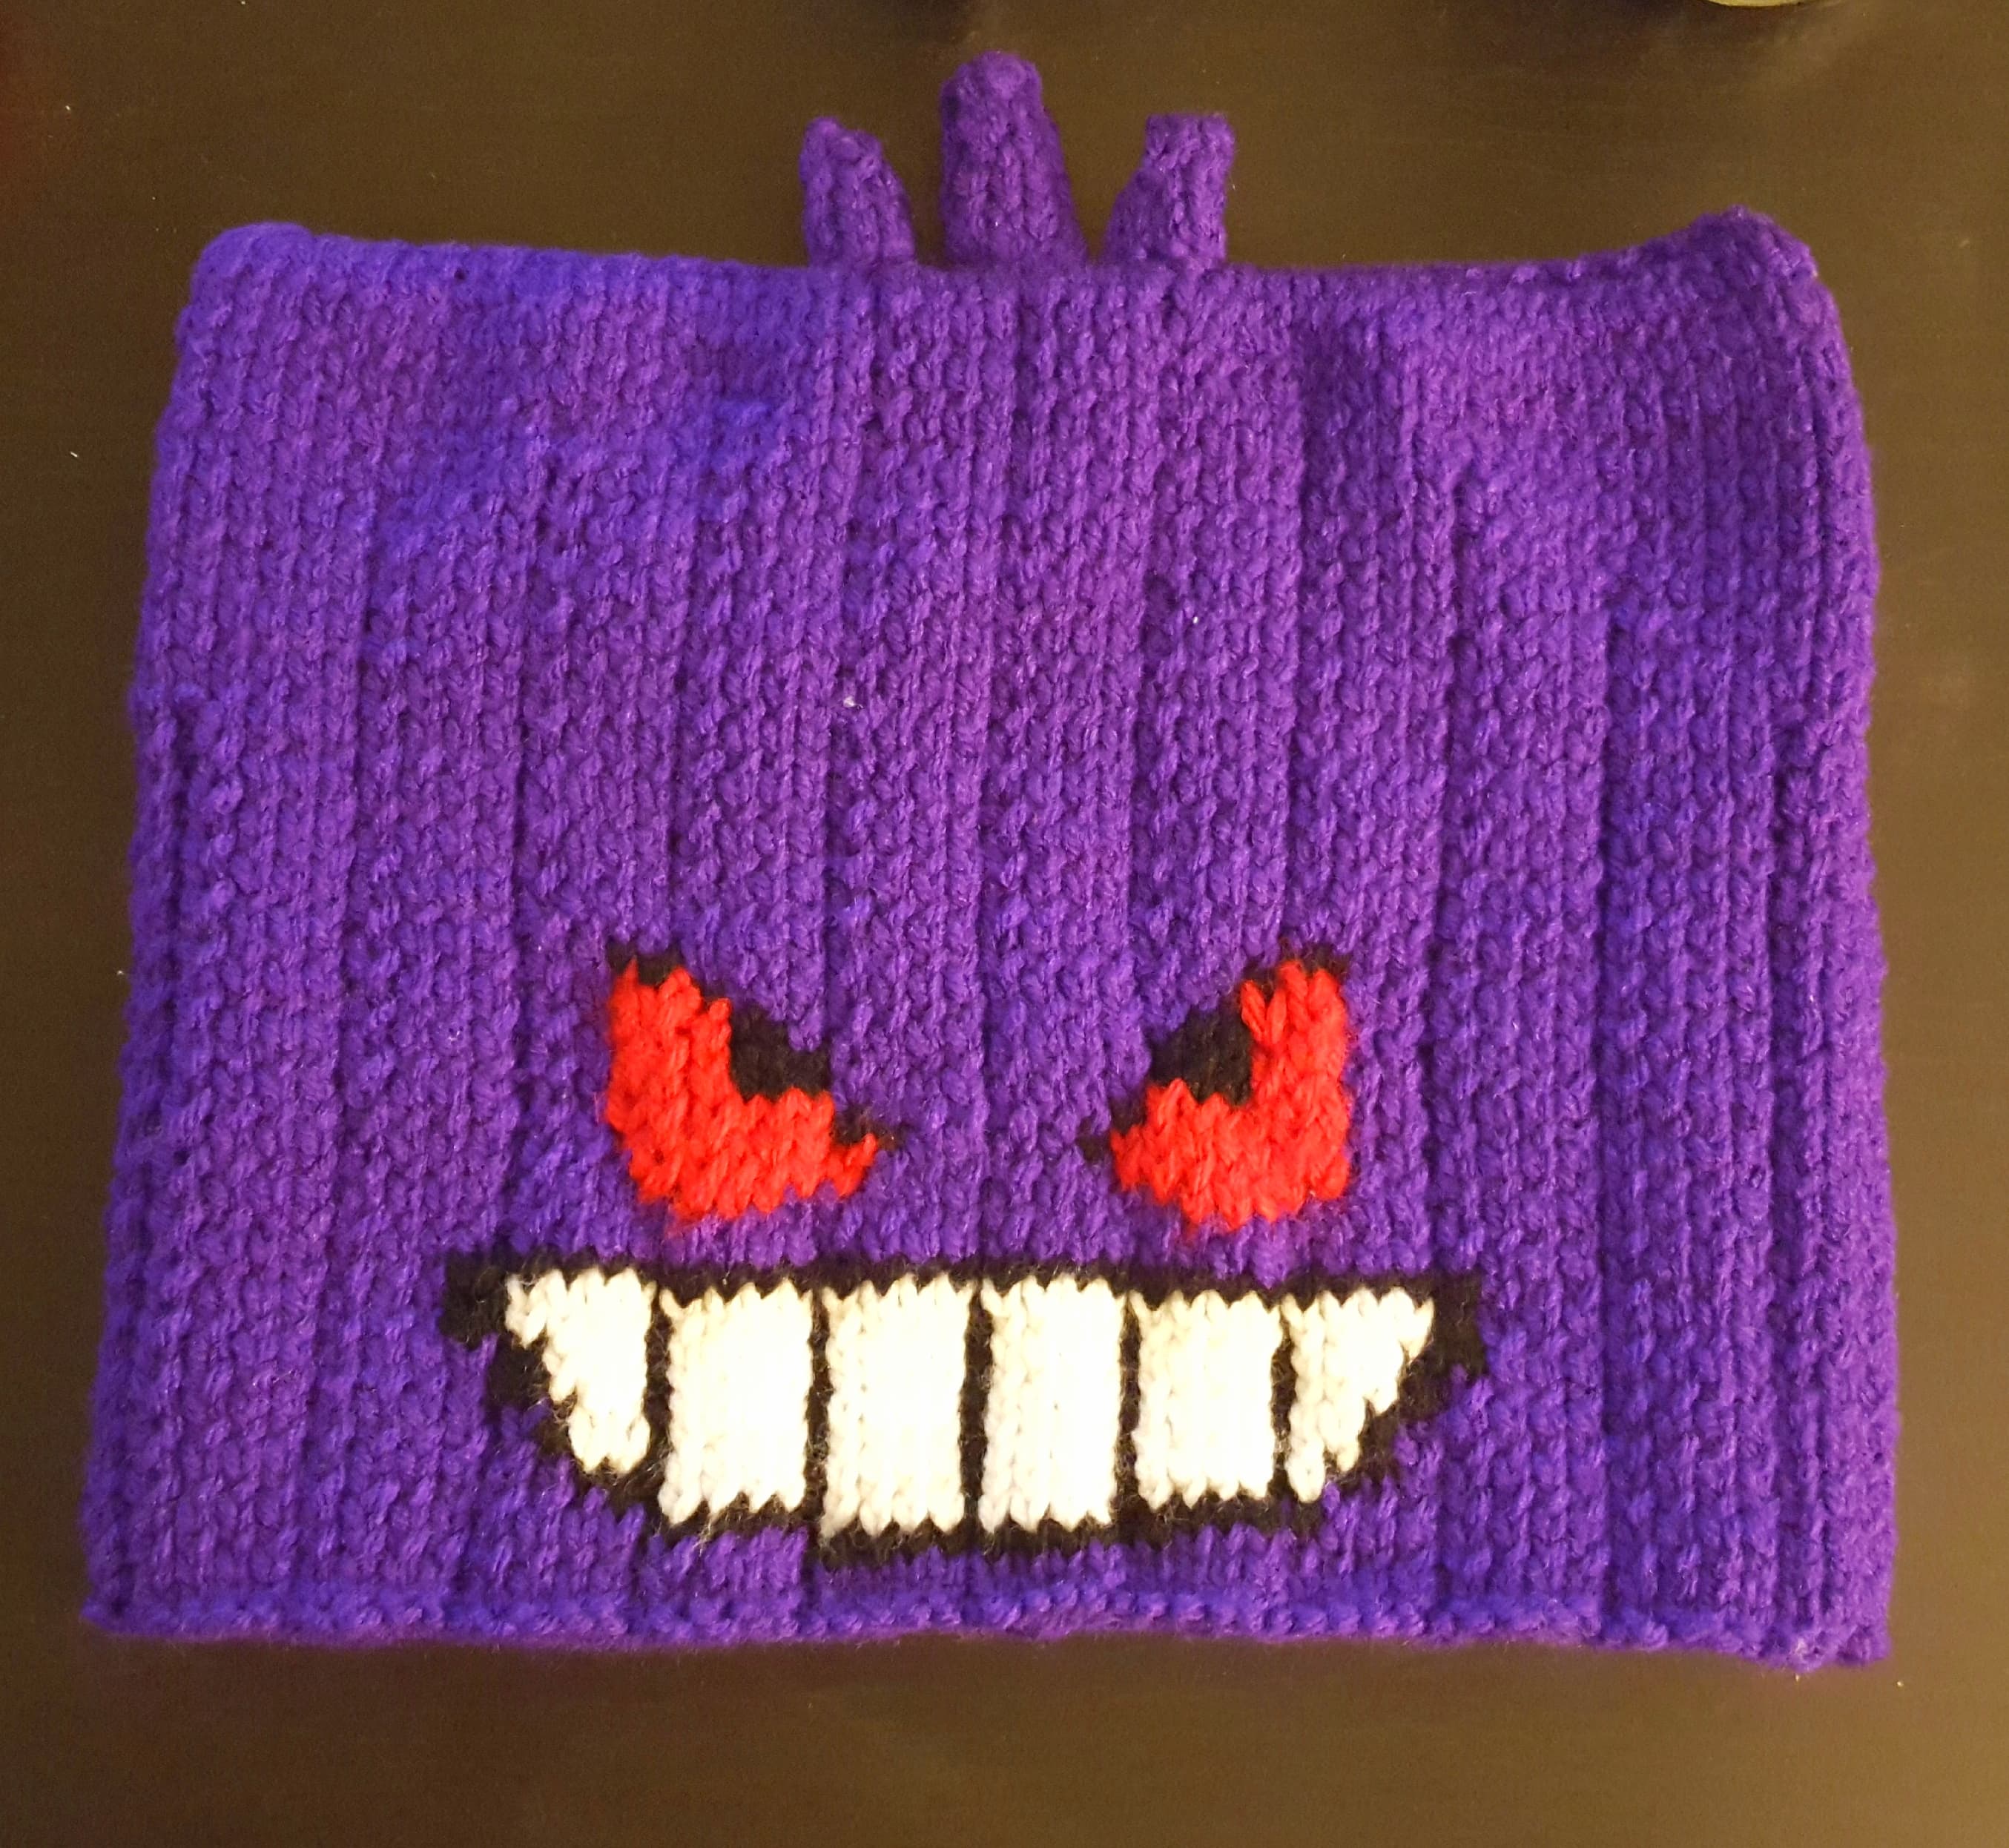
Pattern for Pokemon Go-inspired Gengar beanie:
Knitted on size 8 needles, medium weight yarn
Final dimensions: 20″ (51 cm) circumference (unstretched), 7.5″ (19 cm) height
Colors: Purple, Black, White, Red
Front
Starting with purple, c/o 57 stitches
R1: K3 P1 [K4 P1]x10 K3
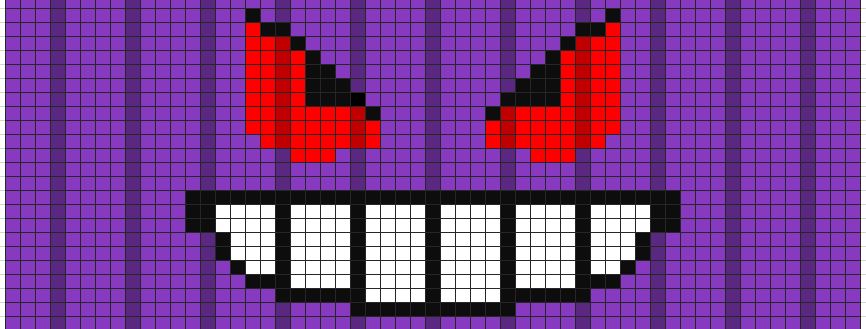
R2: Begin the black line at the bottom of the mouth. For the face pattern, I think this graph does a better job showing the colors than I would do describing it. Lighter colors are the 4 rib, darker colors are the 1 rib (black is just black on this graph but follow the ribbing stitch used for that whole column).
**An explanation of how to do the multiple colors in fair isle is located at the bottom of this post**
Once the face is complete,
R24: P3 K1 [P4 K1]x10 P3
R25: K3 P1 [K4 P1]x10 K3
Repeat [R24, R25] until piece measures 5″ (12.5 cm) long, finishing after a reverse side row
R26*: K8 P1 [K4 P1]x8 K8
R27*: P8 K1 [P4 K1]x8 P8
Repeat [R26*, R27*] until piece measures 6″ (15 cm) long, finishing after a reverse side row
R28*: K13 P1 [K4 P1]x6 K13
R29*: P13 K1 [P4 K1]X6 P13
Repeat [R28*, R29*] until piece measures 6.5″ (16.5 cm) long, finishing after a reverse side row
R30*: K18 P1 [K4 P1]x4 K18
R31*: P18 K1 [P4 K1]x4 P18
R32*: K23 P1 [K4 P1]x2 K23
R33*: P23 K1 [P4 K1]x2 P23
Repeat [R32*, R33*] until piece measures 7.5″ (19 cm) long
c/o
Back
c/o 57 stitches in purple
R1: K3 P1 [K4 P1]x10 K3
R2: P3 K1 [P4 K1]x10 P3
Repeat [R1, R2] until piece measures 5″ long, finishing after a reverse side row
R3*: K8 P1 [K4 P1]x8 K8
R4*: P8 K1 [P4 K1]x8 P8
Repeat [R3*, R4*] until piece measures 6″ (15 cm) long, finishing after a reverse side row
R5*: K13 P1 [K4 P1]x6 K13
R6*: P13 K1 [P4 K1]X6 P13
Repeat [R5*, R6*] until piece measures 6.5″ (16.5 cm) long, finishing after a reverse side row
R7*: K18 P1 [K4 P1]x4 K18
R8*: P18 K1 [P4 K1]x4 P18
R9*: K23 P1 [K4 P1]x2 K23
R10*: P23 K1 [P4 K1]x2 P23
Repeat [R9*, R10*] until piece measures 7.5″ (19 cm) long
c/o
Short Hair (make two)
c/o 8 stitches in purple
R1: K across (8)
R2: P across (8)
R3: K3 K2tog K3 (7)
R4: P2 P2tog P3 (6)
R5: K2 K2tog K2 (5)
R6: P1 P2tog P2 (4)
c/o
Long Hair (make one)
c/o 10 stitches in purple
R1: K across (10)
R2: P across (10)
R3,4: repeat [R1, R2]
R5: K4 K2tog K4 (9)
R6: P3 P2tog P4 (8)
R7: K3 K2tog K3 (7)
R8: P2 P2tog P3 (6)
R9: K2 K2tog K2 (5)
R10: P1 P2tog P2 (4)
c/o
Assembly:
Mattress stitch the sides of the front and back together. Whip stitch the tops together.
Fold the pieces of hair so that they make long tubes and stitch the sides together, closing the top but leaving the bottom open. Stitch the hairs onto the center of the top of the hat. Weave in all ends or tie and cut.
This hat is plenty large to add a fleece liner for extra warmth if you so choose!
As always, let me know if you have any questions about my methods! Leave a comment below or contact me via Instagram (@createmarvelous)
Note: Fair Isle Knitting
To do the face on Gengar, I used the Fair Isle technique, which is very straightforward. It allows you to use many different colors by simply pulling the yarn strands through on the reverse side. So if you switch colors, just drop the color you were working with and pick up the color you want to use.
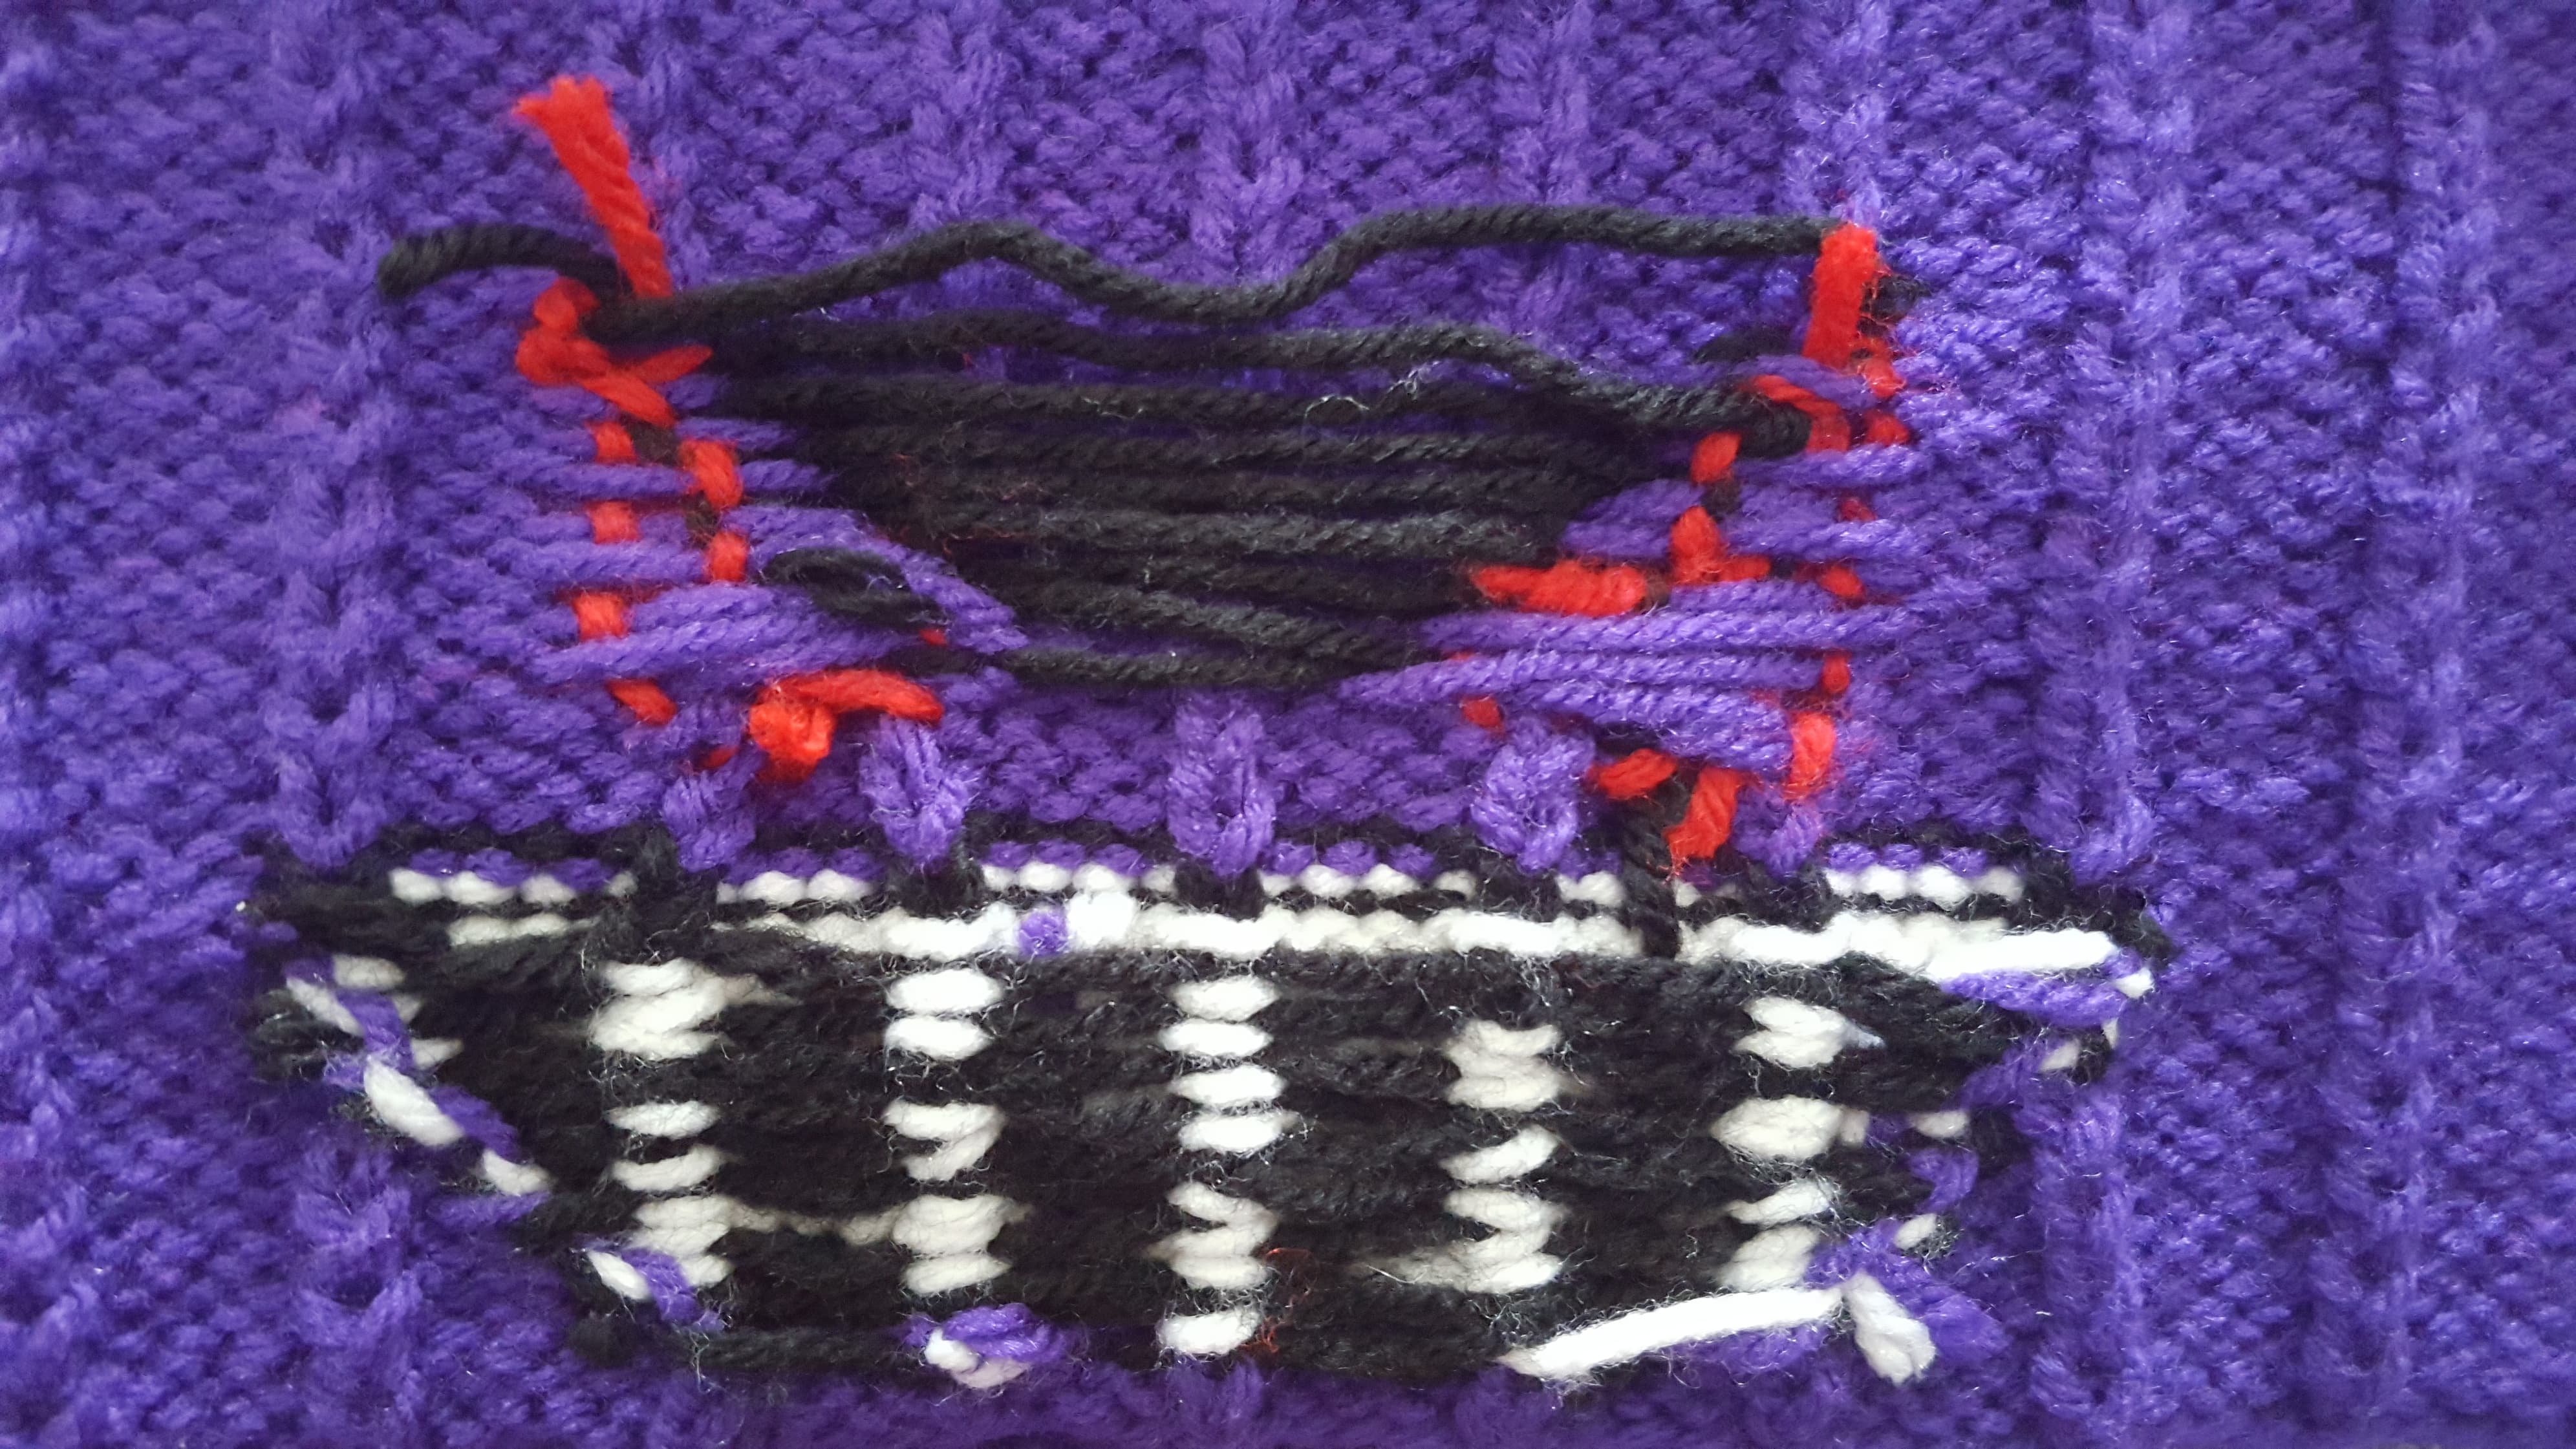
The biggest challenge with Fair Isle is leaving enough slack in the yarn that the patterned part is still stretchy, but not so much that the yarn behind is drooping, since that could leave visible holes and loose stitches in the front (you can see that last black strand at the top is going a little crazy).
Also, for this pattern I recommend using two separate purple strands for either side of the mouth just because the mouth becomes so wide it’s a lot of purple to try to pull across and it’ll likely end up being too tight on the ribbing. If you do make the purple two separate strands like I did, be sure to wrap the purple and the black together each row (since the purple and black won’t be connected otherwise and you’ll definitely get a nice big hole if you don’t)


